Showing posts with label tutorial. Show all posts
Showing posts with label tutorial. Show all posts
Monday, August 1, 2016
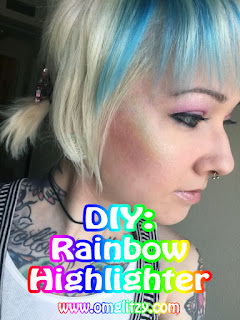
Tutorial: DIY Rainbow Highlighter
Have you dreamed of becoming a unicorn princess? Well then this tutorial is for you! No unicorn princess is complete without a prism of rainbows shimmering across their cheeks!
I first saw the rainbow highlighter craze on Instagram when Bitter Lace Beauty first launched their product. Their small independent business exploded overnight. The original product now has a 9-10 month preorder! Due to the long wait, many people came up with a "DIY" version that you can create at home. I followed several guides to see if I could make my own and took some pics of my process! Hope you enjoy!
Sunday, October 11, 2015
Tutorial: Cinderella 2015 Cosplay
If you're like me then you totally fell in love with all the costumes in the new live action Cinderella movie! Lily James portrayed the princess perfectly! I knew right away that I had to have her dress in my life, but I was scared to take on such a project. Her dress is massive!! So with a little creativity I was able to recreate a version of that magnificent ballgown without breaking the bank. I realize I didn't make a 100% screen accurate cosplay and I'm okay with that. I still felt like a princess wearing this! I'm hoping this semi-homemade tutorial will help inspire someone else that might want to make Cinderella's gown. Enjoy!
Sunday, September 6, 2015
Tutorial: Princess Anna Cosplay
Hi everyone! It's been way too long since I posted, and what better way to come back than with a cosplay tutorial! Halloween is right around the corner, and Frozen isn't going away any time soon so today I am sharing with you how I made my Princess Anna costume. I wore this cosplay to Animation Celebration last year and this past January I fixed it up a bit and took some better photos of it! I hope you find this tutorial helpful!
Thursday, June 25, 2015
Tutorial: Wonder Woman Cosplay Costume
She is brave! She is fierce! She is .. Wonder Woman! I chose to make a Wonder Woman cosplay to wear to the Dallas Comic Con (now called Fan Expo Dallas) because I wanted to wear a costume that was fun, colorful and a character I admired. I feel like no other comic book superhero fits that criteria better than Wonder Woman! So if you have ever considered making this cosplay for yourself here is my tutorial/walk through/guide of how I made mine!
Monday, March 9, 2015
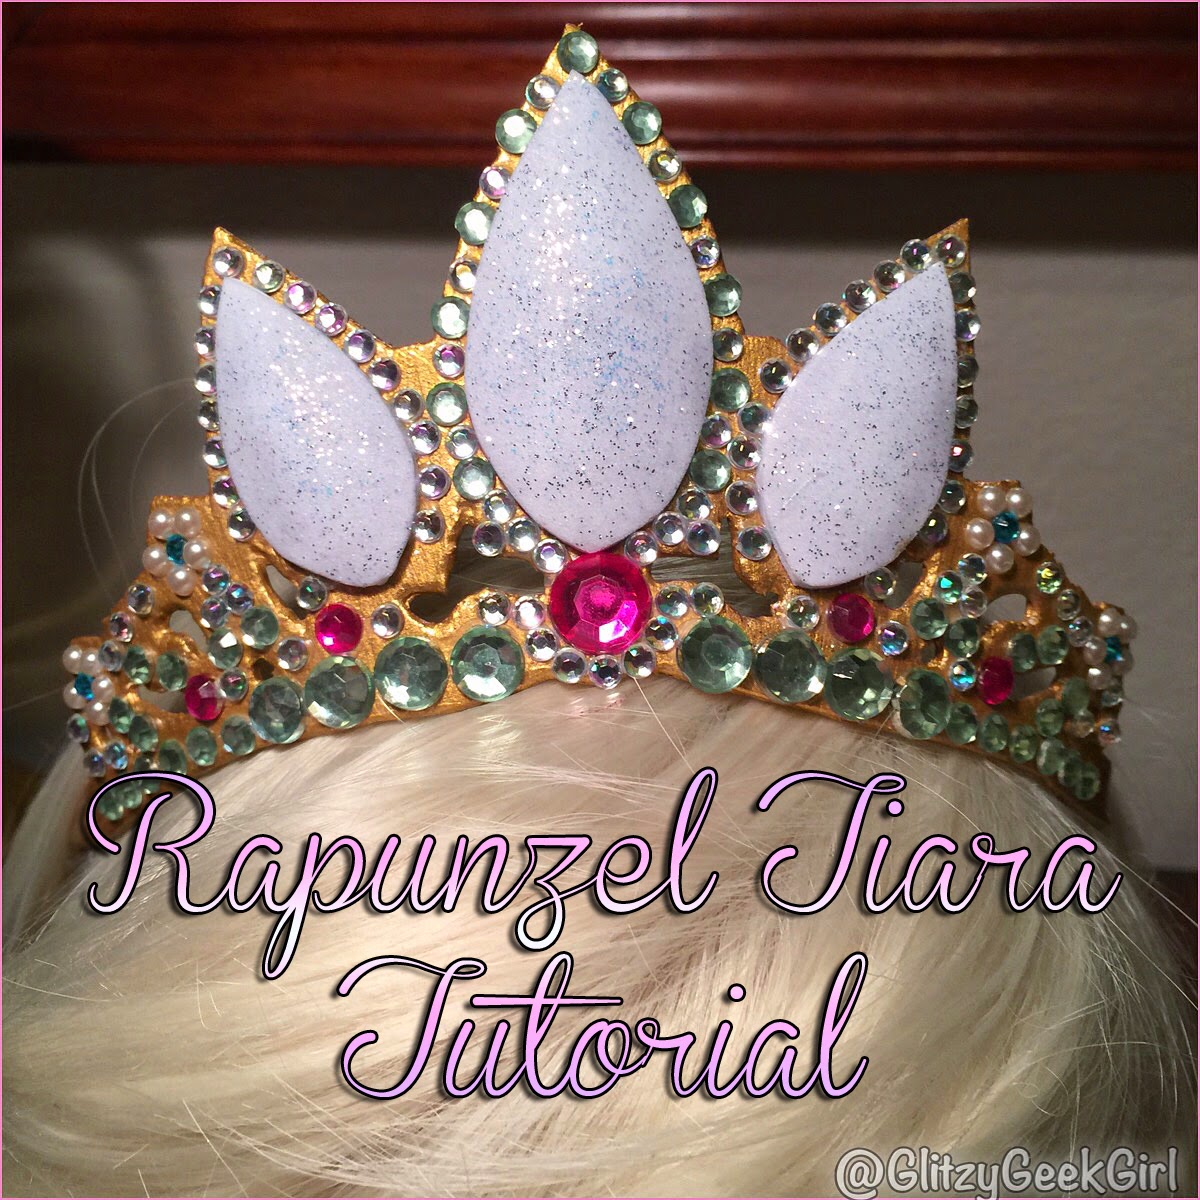
Tutorial: Rapunzel Tiara
I've got a dream! I've got a dream!
It's to be a princess, of course! I had been looking for an affordable Rapunzel crown for quite some time but sadly could only find child sizes. So one night I decided to make the crown myself with whatever materials I had laying around.
And to help other lost princesses I decided to make a tutorial so you can become royalty as well!
Friday, January 9, 2015
Tutorial: DIY Felt Cat Ear Headset
*Update!* I made some more cat ears live on my Twitch channel! Click here to view it!*
Today I have a super cute and fun tutorial for cat lovers and gamers! I wanted to make my gaming headset – the Razer Kraken – more kawaii so I created some detachable felt cat ears. This tutorial is very easy and requires no sewing! Check it out!
Monday, November 10, 2014
Tutorial: Sailor Ariel Cosplay
For AKon 25 and Anime Fest 2014, I cosplayed as Sailor Ariel – a mashup of The Little Mermaid and Sailor Moon. The original art for this was done by Drachea Rannak. Here is a walkthrough of how I made my costume. 🙂
Sunday, November 2, 2014
Disney Pin Trading Board
On my second trip to Disney World, I was introduced to Pin Trading! I didn’t participate in it my first trip and let me tell you, doing the trading makes the experience even more fun! When going into each shop and ride you feel like you’re on a mission to check out what pins the cast members had. It was really exciting to try and locate certain ones – I was looking for the Disney Princess shoes. I also bought a couple like the Rapunzel and Tinkerbell and Grape Soda pin from Up. And the Elvis Stitch was a gift from my brother when he first visited Disney, too! A few of these were also traded with friends on Instagram and Facebook pin trading boards. This is a really fun hobby to have so I wanted to showcase my pins on a decorative board I could hang up in my room. And here’s how I made it!
Supplies needed:
Canvas – mine is 11×14
Paint brush
Acrylic paint
Ribbon
Tacky glue
Glitter
First paint your canvas any color you want. I chose metallic purple to match the ribbon I found at Hobby Lobby.
I did two coats of paint. Make sure to let the first coat dry completely. Before the second finished drying I sprinkled some fine glitter onto it.
Next, measure how much ribbon you’ll need and cut them into four strips.
Then dab on some tacky glue and use a brush to smooth it out. Lay your ribbon over it and gently press it down to smooth out bumps.
I let everything dry over overnight, then the next day I put my Disney pins on the board! I like this better than using a cork board because my mickey pin-backs stay with the pins.
I love having a special place for all my collected pins! And I hope to collect more someday and make another colorful canvas board for them.
:+:+:+:+:
Have you ever done Disney Pin Trading?
How do you store your pins?
Thursday, October 2, 2014
Tutorial: Princess Celestia Cosplay
In My Little Pony: Friendship is Magic, Princess Celestia is the co-ruler of Equestria alongside her sister Princess Luna. I had been dreaming of cosplaying Celestia for a long time because she is so majestic and beautiful. She has such a kind and gentle spirit and is a wonderful mentor to Twilight Sparkle and the other ponies. I love her pastel rainbow mane and golden armored accessories. So for this tutorial I will show you how I made my cosplay!
Tuesday, September 2, 2014
Once Upon A Time Cosplay: Evil Queen Regina Costume
I am so excited to share with you all my Once Upon A Time cosplay of the Evil Queen Regina!!!
This cosplay is special to me because it's proof you CAN use a Halloween costume for cosplay! Anyone that says you can't is silly. Sure, I enjoy making a lot of my own stuff, but sometimes I just don't have the time or money to make an entire cosplay from scratch. I've used pieces from Halloween stores for several of my cosplays in the past. So when Costume SuperCenter contacted me about modeling one of their costumes, I couldn't have been more stoked!! Going through their gallery was a lot of fun, too. They have SO MANY to choose from for all genres and fandoms.
After narrowing it down, I finally chose the Elite Wicked Queen costume. I picked this because it's not something I would know how to make on my own. Evil Queen Regina from Once Upon A Time wears some exquisite dresses, and the time and money it would take for me to find patterns and fabrics would have been stressful. The costume came in a dress bag inside a well-packaged box.
**I chose a size Large – I'm 5'10 and about 145 pounds.**
More photos and lots of great details>>>
Friday, August 1, 2014
Tutorial: Steampunk Princess Leia Cosplay
For the North Texas Comic Book Show, I decided to make a Steampunk Princess Leia cosplay! I have always loved the Steampunk culture, but never made a costume before. The reference art is by Jeff Miller with concept by Bjorn Hurri, and the photo of me was taken by My Geeky Geeky Ways. I was excited to do Princess Leia because she is a strong heroine and very recognizable. It was fun putting a Steampunk twist on this classic character. In this tutorial, I will show you how I made a Steampunk Nerf gun and holster, and where to find the other pieces for this costume.
First, I couldn't have done this costume without this amazing corset from Corset Story. I made a faux corset before (you can find that tutorial here), but for Princess Leia I wanted it to look really legit. Corset Story has so many options for corsets including over bust, under bust, steel boning, bridal, waist training, and numerous colors to pick from. There's no doubt they will have what you're looking for.
Monday, July 28, 2014
Tutorial: Furry Ears
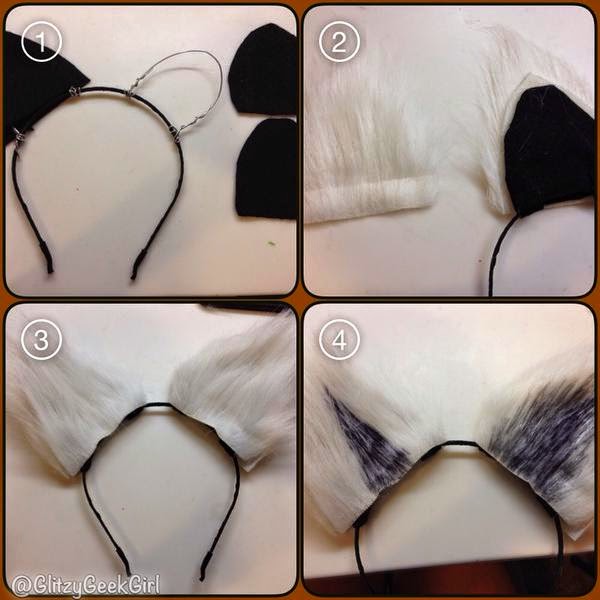
After watching the incredible Commander Holly make a Rocket Raccoon cosplay for SDCC, I was inspired to make some raccoon ears myself! I figured this would be fun to wear to the premiere of the Guardians of the Galaxy movie. I looked up pictures of raccoon ears for reference, but you could use this tutorial to make cat, bear, fox, or any furry ears!
What you’ll need:
A headband, wire, wire cutter, craft foam, fake fur, scissors, hot glue, Sharpies
1) Cut your wire to make two ear shapes on your headband. Then sandwich some craft foam around the wire to hide it.
2) Cut your fake fur a little bigger than the foam ears and sandwich them the same way.
3) Glue it all the way around with hot glue.
4) Gently color your fur with your choice of Sharpie. I started with black in the middle, silver around that, and then left the edges white. I would have liked to have added brown, but I didn’t have a brown Sharpie with me. 🙂
Keep adding color to it until it suits your fancy! I also colored the back of my ears to look striped like a raccoon. And since there is wire in the ears you can bend them! I cupped mine a little and folded one ear down more than the other.
Now you’re ready to guard the galaxy as one of the most fierce raccoons ever!
:+:+:+:+:
These ears were so easy to make! I would love to make more in different colors. Let me know if you use this tutorial!
What animal ears would you like to wear?
Will you be seeing Guardians of the Galaxy?
Friday, July 18, 2014
Healthy Hair Color Tips: Bleaching and Funky Colors
A question I am asked a lot is “How do you keep your hair so healthy?” Well let me first admit that my hair has been through a lot! But being a hairstylist that’s quite normal. We love to change our hair color often! It can take a toll on the strength and integrity of your hair strands. So over the years I’ve figured out what works best for *my* hair. I’m hoping this post will help others that might need some hair care advice, but remember everyone’s hair is different. I’ve been doing hair professionally since 2007, and I’ve seen firsthand the effects various dyes and products can do on hair. So definitely talk to your stylist for a professional opinion because they will know best!
For my own hair, I bleach the new growth (roots) with Wella’s Blondor and 40 volume developer. If I need to strip the color out of the ends of my hair I will use a lower volume that is not as strong. 40 volume on the ends of your hair is a bad idea! Sometimes I’ll wet my ends and shampoo it lightly then lather in some 40 vol bleach. That dilutes it a little and won’t be as harsh on your hair.
I typically let bleach sit on my hair for about 30 minutes under a shower cap. If you plan on doing a bright, funky color then you need your hair as light as possible and may need to sit longer. The best way to explain this is to picture a white piece of paper and different color crayons. The colors will be bright on the white paper, but if you took a darker piece of paper the colors won’t be as vibrant.
Once my hair is light enough, I rinse the bleach out with cold water (yes cold cold) and shampoo it with It’s A 10 Keratin shampoo. When coloring, I don’t use conditioner afterwards. This way my hair is more porous and the funky color will last longer.
Then I gently blowdry my hair until it’s completely dry and plan what color I want to do next. Lately I’ve been doing pastels. To make a pastel dye I squeeze a bunch of conditioner into a bowl. (I use any cheap conditioner since I use a lot of it. Just make sure it’s white. I used a blue one once and it didn’t lighten my dye.) Add some drops of color to your conditioner and stir. If it’s too light then keep adding more color until you like it. Here are some brands of color I use:
When you like the color in your bowl, start putting it on your hair. Always start at your scalp and work down the hair strand. Be sure to take small sections and completely saturate the hair. Funky colors will last longer if you really soak the hair in it. Then I put on another shower cap and let it sit for at least an hour. The longer the better! Most funky colors are demi-permanent, which means they don’t have any ammonia in them. They are not as harmful to your hair. Plus most of your concoction is conditioner and letting it sit on your hair for 1 hour+ is awesome. Your hair is so happy right now.
Once it’s time to rinse I use cold cold water again and let it run until it looks clear in the sink. I don’t shampoo or add any more conditioner to it. I just gently towel dry it and then let it air dry quite bit.
When I’m ready to blow dry I first add a quarter size amount of It’s A 10 Keratin Serum. The keratin helps rebuild the strength in your hair after the bleaching. Then I blow dry with a vent brush and flat iron as normal. After that I add another dime size amount of It’s A 10 Keratin Serum to give it a smooth and shiny finish.
It’s important not to shampoo your hair too often. I probably only wash my hair once a week. The natural oils in your hair are great moisturizers for dryness. I swear I am not endorsed by It’s A 10, but it’s also what I shampoo and condition with in-between coloring! I used a lot of products at the salon I worked at, and it’s the one I liked most. A more affordable alternative is the TRESemme Anti-Breakage collection. I’ve witnessed it work very well!
Finally, be sure to get regular trims to take care of any dead-ends, and try to avoid too much sun damage which can fade hair color and dry it out.
I hope this was helpful! Let me know! 🙂
:+:+:+:+:+:
What type of hair products do you love?
Have you ever colored your hair before?
Wednesday, July 9, 2014
Tutorial: Thor Cosplay
 |
| Photo by April Miller |
For the Dallas Comic Con this year, I was asked to be in a Marvel vs Capcom group! I chose to make a Thor cosplay because he's one of my favorite superheroes, and I really like his new design. At first I had a hard time deciding how to tackle this. After brainstorming for several weeks I finally figured out a pretty easy way to make the outfit. I hope this tutorial helps anyone that may be interested in cosplaying as Thor!!
Sunday, June 22, 2014
Tutorial: Fairy Wings
This year for the Scarborough Renaissance Festival I decided to dress up as a woodland fairy. I had never made fairy wings before, but this YouTube tutorial by Emily Autumn was SO helpful! I basically followed every step so I recommend watching it. In my tutorial I have posted photos of my progress and added a few tips so you can become a fairy, too!
Tuesday, May 27, 2014
Tutorial: Faux Corset
If you've ever looked up high quality corsets then you'll find that they are also high in price. I wanted to attend the local Renaissance festival as a fairy this year and pictured a corset to go with my outfit. I decided to use what I know best – craft foam! Sheets of craft foam are so cheap (like less than a $1!) so if I messed up then I wouldn't feel too bad about it. This tutorial is quite simple, but you will need some basic sewing knowledge. The corset itself doesn't actually squeeze your waist. It's more like a belt to be honest. But I think it gives a nice Renaissance look without the uncomfortable feeling a real corset has.
Monday, May 12, 2014
Tutorial: Disney Mickey Hair Clip
When I visited Disney World, I noticed several little girls wearing these beautiful jeweled Mickey hair clips. I asked one of the mothers where they got it since I hadn’t seen them in any of the gift shops. She said they were given to them at the Bibbidi Bobbidi Boutique. Unfortunately, you have to be 12 or under to get your hair done there, and they weren’t selling these clips separately.
I searched online stores and eBay for them but came up with nothing! I read on one message board that you can find them at Disneyland. Well since I probably won’t be making it to Disneyland any time soon I decided to make one myself. ^.^
Edit: I made this several weeks ago, and this website says they have some in stock now! But if you don’t want to spend $35 then you’ll love my easy Mickey Hair Clip Tutorial! 🙂
The first thing I did was draw the shape onto a sheet of white craft foam. I cut it out carefully then painted it pink, blue and green.
Next, I glued down jewels on top of the corresponding colors. For some reason I didn’t have blue jewels the same size as my pink and green so I had to use a size bigger for them.
After the jewels have dried well, position an alligator clip to the back. Try to make sure you can’t see it from the front.
Now you can create a magical style of your own! Perfect for any fairy tale. 🙂
If you make a Mickey hair clip please share it with me! 🙂
Saturday, May 3, 2014
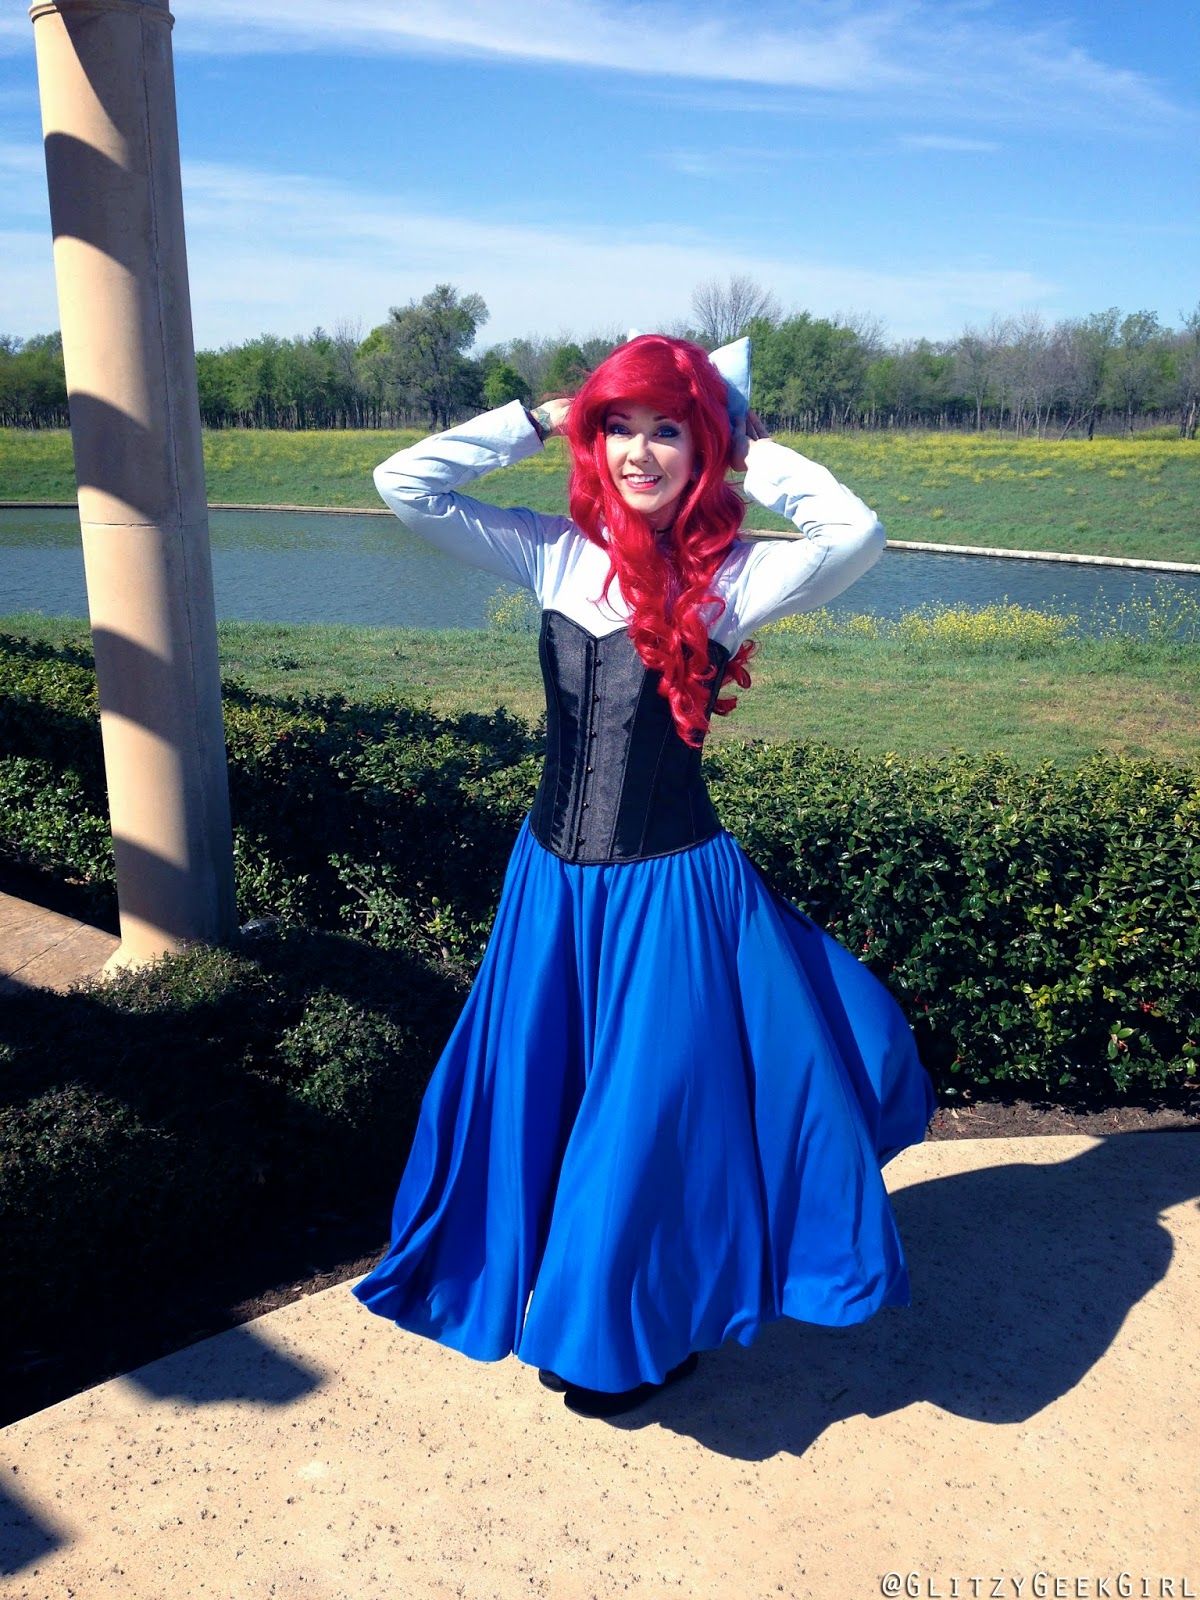
Tutorial: The Little Mermaid Ariel Cosplay
I'm sure you've all noticed I'm quite a big fan of Disney Princesses. So it surprised me when I realized early this year that I had not done a single Disney cosplay. Luckily I made up for it quickly by making my Jessie costume with my friend as Buzz. But I still felt unsettled that I hadn't done a princess! If you follow my Instagram then you know I have done *two* now! So it is my pleasure to share with you my first Disney princess – Ariel in her sight seeing dress!
Tuesday, April 22, 2014
Tutorial: Jessie from Toy Story Cosplay
YEEEEE HAAAAW!!
I'm super excited to share with y'all a root tootin' fun cosplay! It's Jessie from Toy Story! I was inspired to make this costume after my friend Garrett mentioned he wanted to build a Buzz Lightyear cosplay. Jessie had been on my dream list, and I think she looks best when paired with other Toy Story characters. So Garrett and I chatted about it and we both got to working on our costumes! I was so happy with how they turned out. Garrett looked amazing as Buzz! Also, huge thank you to Neither Noir for taking this photo of us. If you'd like to view all of my photos from All-Con then check out my Facebook Album.
Now onto the tutorial!
Friday, April 4, 2014
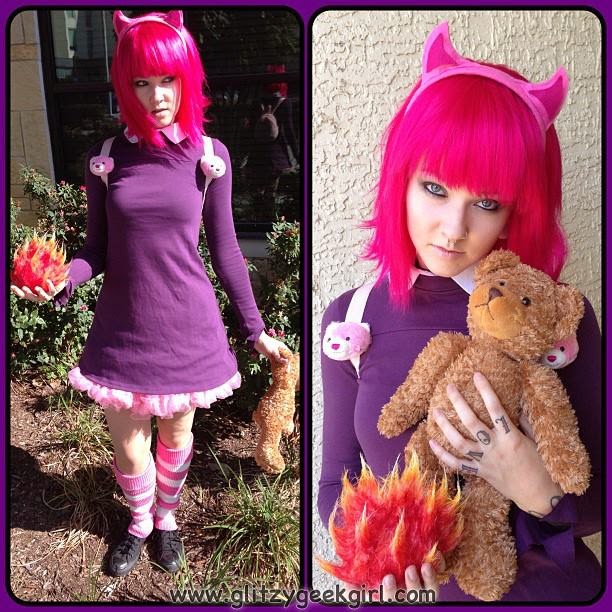
Tutorial: League of Legends Annie Cosplay
Since PAX East is in a few weeks it got me thinking about my trip to PAX Prime last year! Then I realized I hadn't posted a tutorial for my Annie cosplay from League of Legends. I won't be able to go to PAX East this year, but here's the tutorial in case someone wants to dress up as Annie!
Subscribe to: Posts (Atom)

