OMGLITZY: Tutorial: How to make a Yoshi Egg

Sunday, July 14, 2013

Tutorial: How to make a Yoshi Egg

Tutorial time! How to make a Yoshi Egg!
This is super fun and so cute and great for fans of Mario and Nintendo!
Supplies needed:
Paper mache egg
White paint
Green paint
Red paint
Blue paint
Paint brushes
Satin gloss
A pencil
A cup
MORE PHOTOS AND STEPS >>>>

Look in the paper mache section at your local craft store for eggs. I found mine at Hobby Lobby. Some were shaped kinda funny so be sure to find one that looks the right size!
Yoshi’s eggs come in all different colors. I chose classic green, red and blue, but your options are endless! I want to make a pink one 🙂

Find something you can set your egg in so it’s easier to paint and let dry. Cups and a roll of duct tape worked for me.

Paint as much of the egg as you can, then let it dry in your egg stand.

After the top is dry you can paint the bottom. I gave my eggs two coats of white paint.
Next, I freehanded circles onto the eggs using a pencil. These don’t have to be perfect.. Yoshi’s egg has small, big and oval shapes on it. Click the photo above to see my circles better.

I gave each circle two coats of paint, too. Pixie loves it!
Finally, brush on some satin gloss to give your egg a shiny finish!
And in my best Mario voice … “WA-HAAAAAA!”
All done and ready for the giveaway!

3 comments:

  1. Awesome!! I definitely want to make an orange one and a pink one. 🙂

    ReplyDelete

  2. the picture with pixie the best!

    ReplyDelete

  3. They look so perfect!!! I thought maybe Pixie had laid them.

    ReplyDelete

Note: Only a member of this blog may post a comment.

Related Posts Plugin for WordPress, Blogger...

OMGLITZY: Tutorial: Furry Ears

Monday, July 28, 2014

Tutorial: Furry Ears

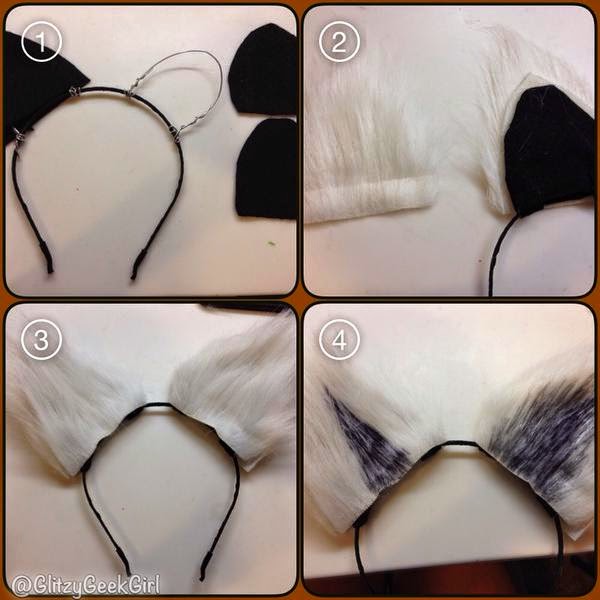
After watching the incredible Commander Holly make a Rocket Raccoon cosplay for SDCC, I was inspired to make some raccoon ears myself! I figured this would be fun to wear to the premiere of the Guardians of the Galaxy movie. I looked up pictures of raccoon ears for reference, but you could use this tutorial to make cat, bear, fox, or any furry ears!
What you’ll need:
A headband, wire, wire cutter, craft foam, fake fur, scissors, hot glue, Sharpies
1) Cut your wire to make two ear shapes on your headband. Then sandwich some craft foam around the wire to hide it.
2) Cut your fake fur a little bigger than the foam ears and sandwich them the same way. 
3) Glue it all the way around with hot glue.
4) Gently color your fur with your choice of Sharpie. I started with black in the middle, silver around that, and then left the edges white. I would have liked to have added brown, but I didn’t have a brown Sharpie with me. 🙂

Keep adding color to it until it suits your fancy! I also colored the back of my ears to look striped like a raccoon. And since there is wire in the ears you can bend them! I cupped mine a little and folded one ear down more than the other.
Now you’re ready to guard the galaxy as one of the most fierce raccoons ever!
:+:+:+:+:
These ears were so easy to make! I would love to make more in different colors. Let me know if you use this tutorial!
What animal ears would you like to wear?
Will you be seeing Guardians of the Galaxy?

7 comments:

  1. Kitty ears! [because I wear them enough already… Lol]

    ReplyDelete

  2. These came out great! I'd totally make kitty ears and YES my husband and I are planning on watching Guadians of the Galaxy 🙂

    Jessica
    the.pyreflies.org

    ReplyDelete

  3. Totally going to wear these when I see guardians next week.

    ReplyDelete

  4. So fluffy!
    These would look so cute in Cheshire Cat colours too :O

    SAMI★SPOON

    ReplyDelete

  5. Oh wow! This was simpler than I thought! Awesome job!

    ReplyDelete

  6. So cute! And easy too, A+. I can't wait to see this movie.

    ReplyDelete

  7. These would be perfect if you wanted to cosplay as Barf from Spaceballs.

    Barf?

    Barf?!

    Baaaaaaaaaaaaaaaaaaaaaaaaaarf!

    ReplyDelete

Note: Only a member of this blog may post a comment.

Related Posts Plugin for WordPress, Blogger...

OMGLITZY: Tutorial: Faux Corset

Tuesday, May 27, 2014

Tutorial: Faux Corset

If you’ve ever looked up high quality corsets then you’ll find that they are also high in price. I wanted to attend the local Renaissance festival as a fairy this year and pictured a corset to go with my outfit. I decided to use what I know best – craft foam! Sheets of craft foam are so cheap (like less than a $1!) so if I messed up then I wouldn’t feel too bad about it. This tutorial is quite simple, but you will need some basic sewing knowledge. The corset itself doesn’t actually squeeze your waist. It’s more like a belt to be honest. But I think it gives a nice Renaissance look without the uncomfortable feeling a real corset has.

The first thing I did was look up what style of corset I wanted to make. I decided to go with an “under bust” that had a pointed top and bottom. This gives the illusion that it’s a corset rather than if it were just straight across like a belt. I cut my shape out of a sheet of craft foam and used a hole puncher on one edge of each piece. This is where you’ll eventually lace it up. Make sure your holes are big enough for whatever type of string or ribbon you’ll be using. For my decoration I drew swirls with a sharpie first to see a pattern. Then I went over my swirls with hot glue for a 3D effect.

After you’re done with all the hot glue decoration, paint your foam with Gesso. This acts as a primer for your paint. I didn’t put any Gesso on the back of mine, but I would recommend it because it also strengthens the foam. 

Once your Gesso is dry, paint your corset any color you’d like. I was going for a “woodland fairy” look so I decided to make my corset resemble leather. I painted the whole thing brown first, then used a sponge to add the gold and little bits of metallic green highlights.
You’re probably wondering how you’re going to actually *wear* this faux corset! For this I held up my two foam pieces to my stomach and marked where the back edge was on my sides. Then I measured the back of my waist from side to side. Then I was able to cut my fabric and hem the edges.

Since I might want to change out the color of this fabric some day, I decided to glue velcro to the fabric and corset edge. This is also handy because it makes it easier to take your faux corset on and off since you won’t have to undo the lacing.
The lacing is a brown cord I had in my craft drawers, but I think a colorful ribbon would look pretty, too.
And that’s how you make a faux corset! I don’t think anyone would know it’s made from craft foam do you? So very comfortable and versatile!
Coming soon is a tutorial for my flower crown and fairy wings. I made both from easy craft supplies, too!
Update: Here is the Fairy Wing Tutorial! 🙂

16 comments:

  1. I absolutely never guessed from your photos that that wasn't a real corset! That's incredible!

    ReplyDelete

  2. Such a clever idea and a great way to save money on a cosplay.

    ReplyDelete

  3. That looks lovely! Thank you for sharing all the steps for making it!

    ReplyDelete

  4. That's a freaking great idea!

    ReplyDelete

  5. This really is a brilliant alternative! Thanks for posting your tutorials!

    ReplyDelete

  6. You're so creative and awesome! Thanks for sharing your process 🙂 It looks amazing!

    ReplyDelete

  7. definitely doesn't even look like it's made from craft foam… very awesome tutorial! thanks for sharing!

    ReplyDelete

  8. You are the queen of craft foam!!! This looks absolutely fantastic.

    ReplyDelete

  9. That's a great idea and it looks fabulous

    ReplyDelete

  10. Amazing designs you have shared. I usually do not like to read any blog, but this was really awesome. I would love to use and buy these corsets now. I have seen these designs in the website http://www.corsetdeal.com/, you can have some new ideas and designs by visiting this website.

    ReplyDelete

  11. Incredible idea ! I very much agree with the fact that its not easy for every girl to buy expensive corsets. I can't express how much happy I am feeling right now by knowing that we can also make corsets and it is money saving too. Thanks for the amazing share. Looking forward for more ideas.

    ReplyDelete

  12. Welcome to the stunning selection of sensual gifts available exclusively here online from Imogen Lingerie. Uniquely personal, intimate gifts luxuriously packaged and presented in a beautiful, reusable box as thoughtfully crafted as the contents. Personalised Imogen Lingerie gift boxes are the perfect choice for any occasion – as Valentine’s Day gifts, Wedding Anniversary gifts, Birthday or Christmas gifts – with sexy, elegant lingerie destined to create the desired impact.

    Corsets

    ReplyDelete

  13. Make your beauty more charming with wonderful corsets, Your post is wonderful you define the lots of corset design and styles, Really a wonderful post i really like the above post thanks for sharing the wonderful post with us.
    ==========
    http://www.corsetdeal.com/Corset-CD-1020-PO-Steampunk-brocade-corset-_p_973.html

    ReplyDelete

  14. My 11 year old just made one using this post! Thanks. It looks AWESOME!

    ReplyDelete

Note: Only a member of this blog may post a comment.

Related Posts Plugin for WordPress, Blogger...

OMGLITZY: Tutorial: Fairy Wings

Sunday, June 22, 2014

Tutorial: Fairy Wings

This year for the Scarborough Renaissance Festival I decided to dress up as a woodland fairy. I had never made fairy wings before, but this YouTube tutorial by Emily Autumn was SO helpful! I basically followed every step so I recommend watching it. In my tutorial I have posted photos of my progress and added a few tips so you can become a fairy, too!

Here are some of the supplies you’ll need to begin making your fairy wings: panty hose, scissors, electrical tape, and wire cutters. I bought some wire at Walmart, but honestly I recommend you use a coat hanger instead. The wire I used did not hold up well in the wind at the festival. I also suggest you buy full length panty hose instead of the knee-length kind like I did. This way you can make bigger wings. I was limited to smaller ones because my hose didn’t stretch as far.

So first you make your shape out of the wire and leave a little wire tail at the end. Stretch your panty hose over the wire being careful not to bend it. Then attach your tails together and secure it with electrical tape.

Do the same with the bottom of the wings.

Now that we have our shape it’s time to paint! I used a sponge with acrylic paint and chose colors that reminded me of the forest.

I recommend you paint both sides of your wings. I was surprised how much of the wings you could see from the front of my body, and the panty hose looked splotchy on the other side without a second coat.
After you’re done painting, use tacky glue to create a swirlie design of your choice. Then sprinkle glitter onto the glue. If you don’t want a lot of glitter on the rest of your wings then make sure to wait until your paint is dry to do this step.

Next, wrap some ribbon over the electrical tape and glue it in place.
Then, glue some fake leaves and flowers in the center.
To wear your wings, measure the length of a ribbon to fit over your shoulders like a backpack. Then tie the ribbon around the wire in the middle of your wings. You’ll need some help putting them on, however. My mom had to hold the wings to my back as I tied the ribbon over my arms. 
I loved wearing my wings to the festival and even met some other fairies! Their wings were beautiful!!!

Hope you enjoyed this tutorial!
And be sure to check out my Faux Corset Tutorial here.
~Fairy Blessings!~

1 comment:

  1. Those wings look great! I love your painting and how you covered the "ugly" middle part with the leaves and flower! Thanks for sharing the YouTube link too!

    ReplyDelete

Note: Only a member of this blog may post a comment.

Related Posts Plugin for WordPress, Blogger...

OMGLITZY: Tutorial: DIY Rainbow Highlighter

Monday, August 1, 2016

Tutorial: DIY Rainbow Highlighter

Have you dreamed of becoming a unicorn princess? Well then this tutorial is for you! No unicorn princess is complete without a prism of rainbows shimmering across their cheeks!
I first saw the rainbow highlighter craze on Instagram when Bitter Lace Beauty first launched their product. Their small independent business exploded overnight. The original product now has a 9-10 month preorder! Due to the long wait, many people came up with a “DIY” version that you can create at home. I followed several guides to see if I could make my own and took some pics of my process! Hope you enjoy!

The first thing I did was visit my local Sally’s Beauty Supply to pick up some of their super cheap eyeshadows. These were even on sale so I got all these shades for only $5. You’ll want to grab one of each color of the rainbow – ROYGBIV! You’ll also need a white shimmer to add to the pigments to make them more of a “highlight” rather than a bright solid color.

You will also need some rubbing alcohol. If you don’t have some on hand I got mine at Target. I am sure any grocery store carries it and it is not very expensive.

The highlighter needs to go in a medium sized pan so I emptied out an old powder I had at home.

Now let’s get messy!

Using a plastic spoon, I scraped out all of the eyeshadow onto a paper plate. I recommend using a muffin pan if you have one because it was kind of difficult to do this on the paper plate.

Also scrape some of the white shimmer into the color.

Add a few drops of the rubbing alcohol and mix your powder until it becomes a paste. Add some more white shimmer to it if it still looks too dark. Then scoop your paste and put it in the side of your pan.

Continue doing this for all your shades!

OoOoooOoo!!

Once you have all your colors in your pan you will want to cover it with a paper towel and use something smooth to press it tightly into the pan. I used one of my blushes and pressed down several times until it stopped leaving wet/colored markings on my paper towel.
Once you have pressed your powder really well, you will want let it dry overnight. This is to make sure it sets completely.

I was nervous to clean the outer edge of mine because I didn’t want it to crack. So I would suggest you do that before it dries completely.
After waiting for what felt like an eternity, it was finally time to play with our creation!

It took several swipes for the pigment to show up on my brush. I may have added too much white shimmer to mine. The idea is to be a highlight, however, so maybe it was just right!
Now I am a unicorn princess like I have always dreamed!

Although it was a messy project, I still found it very fun and rewarding to make. The highlighter shows up best in direct sunlight. However, sometimes it kind of looks like my cheek is bruised. I would suggest using a smaller amount of blue and green! 😛
Let me know in the comments what you think and if you make your own Rainbow Highlighter!
Xoxo,
Glitzy

4 comments:

  1. This is amazing!! I really want to do this. Thanks so much for the tutorial! <3

    ReplyDelete

  2. Really cool DIY~! I want to try this out now <3

    http://alluringalyssbeauty.blogspot.com/

    ReplyDelete

  3. So cute!!
    It came out really lovely and totally suits you

    SAMI★SPOON

    ReplyDelete

  4. I don't care too much about make up, but this is a pretty amazing idea! Also, I just stumbled upon your blog and I have to say I absolutely love it ♥_♥
    Hugs, Piskeri
    My blog °O°

    ReplyDelete

Note: Only a member of this blog may post a comment.

Related Posts Plugin for WordPress, Blogger...

OMGLITZY: Tutorial: DIY Felt Cat Ear Headset

Friday, January 9, 2015

Tutorial: DIY Felt Cat Ear Headset

*Update!* I made some more cat ears live on my Twitch channel! Click here to view it!*
Today I have a super cute and fun tutorial for cat lovers and gamers! I wanted to make my gaming headset – the Razer Kraken – more kawaii so I created some detachable felt cat ears. This tutorial is very easy and requires no sewing! Check it out!


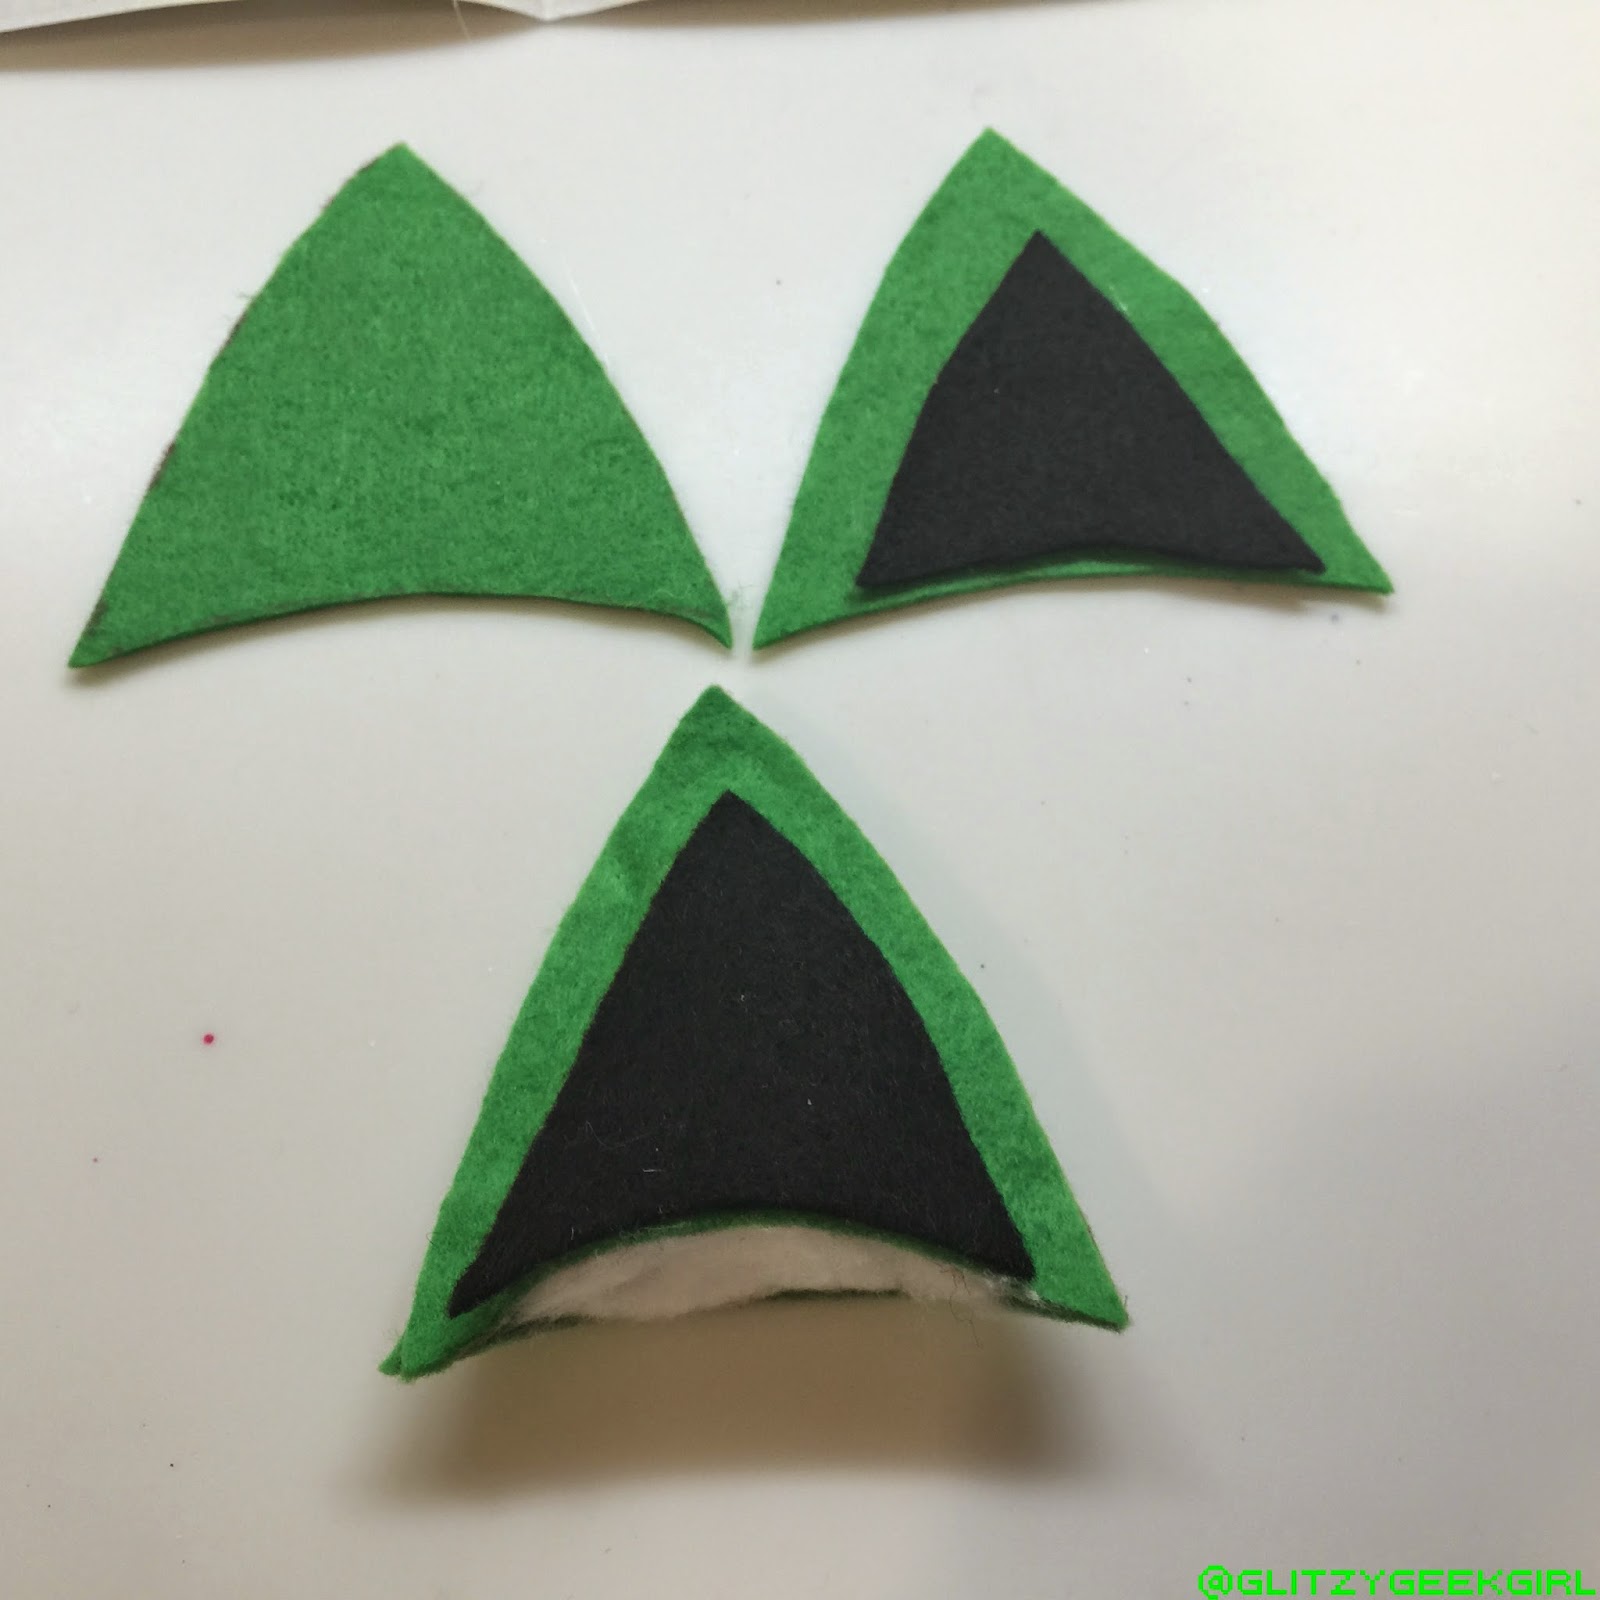
First you want to pick out two colors of felt. I chose green and black to match my Razer Kraken headset. Next cut out four triangular shapes with a slightly curved up bottom. You’ll also need two of your second color in a little bit smaller size.
All you have to do is add a thin line of hot glue along the two sides of one of the triangles. Then lay the other triangle on top of it. Glue your smaller second color on top and stuff a cotton ball into the pocket you made.

Then you will glue the bottom of your triangle where the cotton ball is onto a rectangle of felt.
The rectangle is just big enough to wrap around my headset. So make sure you test fit it on yours for a snug fit.
To make your cat ears removable glue on some velcro to the rectangle.
This way you can choose to take them on and off or change the colors out if you make more!

The felt is super comfy. You won’t feel it pressing into your head at all even after hours of gaming.

(I took these two pics awhile ago which explains why my hair is brown, lol)

Meow! You’re ready to game in style!

These are great for cat lovers. My kitty, Pixie, and I match now!

Except I should have folded one of my ears down, hehehe.

So this was a very inexpensive and easy way to add some kitty flare to your gaming headset. This works best with thicker headsets, although I am sure you could make the rectangle smaller to attach to a skinner headband if needed.
I plan to make these in more colors so I can change them out. You could even do bear ears by making them rounded instead of triangular!!
:+:+:+:
Let me know in the comments what you think!
And if you make some ears for your headset send me a pic! 🙂

11 comments:

  1. I'm SO doing this to my headset! … This weekend!!! <3

    ReplyDelete

  2. I love this! I want those headphones anyway, I can't wait now! 🙂

    ReplyDelete

  3. SO CUTE! 😀 Thanks for sharing.

    ReplyDelete

  4. That is such a nice touch to your headphones! They look adorable. ^^

    http://nagareboshi9.blogspot.ch/

    ReplyDelete

  5. I Tweeted a link to this page recently because I found it so amazing — About to make a pair myself for my own headset! ^o^/ Thank you so much for creating this tutorial.

    ReplyDelete

  6. Where did you get the felt from for this? Finding it hard to get a green that matches the headset! 🙂

    ReplyDelete

    Replies

    1. I bought my felt from the craft store Hobby Lobby! 🙂

      Delete

  7. I love my new cat ear headphones!<3 Thank you for sharing this amazing idea of yours!! 🙂

    ReplyDelete

  8. I'll have to tinker with this and I might have to sew it, which I'm not sure it will work but I'll see… Do you think it would work?

    ReplyDelete

Note: Only a member of this blog may post a comment.

Related Posts Plugin for WordPress, Blogger...

OMGLITZY: Tutorial: Disney Mickey Hair Clip

Monday, May 12, 2014

Tutorial: Disney Mickey Hair Clip

When I visited Disney World, I noticed several little girls wearing these beautiful jeweled Mickey hair clips. I asked one of the mothers where they got it since I hadn’t seen them in any of the gift shops. She said they were given to them at the Bibbidi Bobbidi Boutique. Unfortunately, you have to be 12 or under to get your hair done there, and they weren’t selling these clips separately.
I searched online stores and eBay for them but came up with nothing! I read on one message board that you can find them at Disneyland. Well since I probably won’t be making it to Disneyland any time soon I decided to make one myself. ^.^
Edit: I made this several weeks ago, and this website says they have some in stock now! But if you don’t want to spend $35 then you’ll love my easy Mickey Hair Clip Tutorial! 🙂
The first thing I did was draw the shape onto a sheet of white craft foam. I cut it out carefully then painted it pink, blue and green.

Next, I glued down jewels on top of the corresponding colors. For some reason I didn’t have blue jewels the same size as my pink and green so I had to use a size bigger for them.

After the jewels have dried well, position an alligator clip to the back. Try to make sure you can’t see it from the front.

Now you can create a magical style of your own! Perfect for any fairy tale. 🙂

If you make a Mickey hair clip please share it with me! 🙂

8 comments:

  1. That's so clever! I think I need to make a trip to the craft store, I want to make some right away 🙂

    ReplyDelete

  2. Sweet idea!!! I need to make a couple for my upcoming trip to WDW!!! So excited!! We will be there during Star Wars weekend!!

    ReplyDelete

  3. OMG! So cute. I love the colour combination. I am going to make this on the weekend. Thanks for sharing.

    ReplyDelete

  4. How fun and creative! I love that you don't let anything stop you 🙂

    ReplyDelete

  5. Such cute colors! Thanks for sharing!! ^__^

    ReplyDelete

  6. Such a cute clip. I just love your style. ^^

    http://nagareboshi9.blogspot.ch/

    ReplyDelete

  7. Your ingenuity never ceases to inspire me! I like your way of thinking lady!
    (I'm still blown away by your erasures as arrow-head from you Legolas cosplay btw!)
    great tutorial!

    ReplyDelete

Note: Only a member of this blog may post a comment.

Related Posts Plugin for WordPress, Blogger...

OMGLITZY: Tutorial: Cinderella 2015 Cosplay

Sunday, October 11, 2015

Tutorial: Cinderella 2015 Cosplay

If you’re like me then you totally fell in love with all the costumes in the new live action Cinderella movie! Lily James portrayed the princess perfectly! I knew right away that I had to have her dress in my life, but I was scared to take on such a project. Her dress is massive!! So with a little creativity I was able to recreate a version of that magnificent ballgown without breaking the bank. I realize I didn’t make a 100% screen accurate cosplay and I’m okay with that. I still felt like a princess wearing this! I’m hoping this semi-homemade tutorial will help inspire someone else that might want to make Cinderella’s gown. Enjoy!

This cosplay came to life the moment I found these prom dresses at JC Penney for $9.99. Yep you read that right! Originally priced at $250 – I noticed online it’s only on sale for $99.99 so I may have had really great luck finding these in the store for 10 bucks!! I couldn’t pass up on this deal so I took home two dresses and started deconstructing them. I took off the jewels at the top and cut one of the dresses completely in half. Then I simply reattached it to the other dress to give it more fullness.
I also added the extra petticoat from the first dress. Basically I just combined the two bottom pieces of each gown. And that’s it! It was a lot of dress to work with but was simple to sew. Now I had a fuller dress that was ready to wear. Well.. almost!
I stared at my dress and knew I was going to struggle a bit with the bodice. I’m not familiar with making my own corsets so I turned to The Violet Vixen! They offer a splendid collection of steel-boned corsets to choose from and a free sizing consultation to help you find the perfect fit. I decided to get the Misty Floral Brocade Corset in Classic White and paint it. The paint matched PERFECTLY and was much easier than using dye. It only took one coat and I could still see the beautiful details on the fabric. If you ever need a custom color I can’t recommend this corset and paint method enough.
The next step was to make the ruffle neckline. I bought a yard of extra tulle that matched the bottom of my dress and laid it flat on the ground. I layered it about four times and then stitched it together. Next I only attached it to the front center and back of my dress. I kept it loose because I planned to have it lay OVER the top of my corset. Finally, I gathered it in a few places and attached several butterflies and jewels I bought from Hobby Lobby. I kept mine simple, but you can add as many as you like. Looking back I do wish I had made the ruffles bigger.
For Cinderella’s hair I recommend using Arda’s Ferrari in Dark Ash Blonde. Normally I would say their Ferrari style is perfect as is, but mine seemed a little flat. I’ve bought this style 3 other times and always loved this wig so I am thinking I just got a bum one. Rather than return it, I just ordered some wefts in the same color and hand sewed them in. I also ordered the clip-in braid. Since the wefts are straight I had to curl them. Arda’s hair is heat safe – I used a curling iron at 280 F temperature. After I curled a section I pinned them and let cool completely before taking down. This made beautiful curls!
Underneath my dress I wore this petticoat from eBay. I would have liked to have used a bigger one, but I think it worked just fine. Also, I’m obviously wearing a nude undershirt (from WeLoveColors) because I wanted to hide my tattoos, but that’s totally optional for you!
Big thank you to April Miller for taking these photos!
A Cinderella cosplay wouldn’t be complete without a glass slipper!
My shoes are Walstar and I purchased them from Amazon. The gorgeous butterfly clip is from EnchantedCandy on Etsy. I absolutely plan on wearing these all the time now! They might be my favorite part of this whole costume! 😀
:+:+:+:+:+:
Bibbidi Bobbidi Boo!
So that’s how you take an old prom dress and use a little magic to turn it into a beautiful princess gown! I hope you enjoyed this tutorial and find it useful somehow. Thanks for reading! 🙂
~Glitzy

7 comments:

  1. This turned out gorgeous! Great find on the $10 prom dresses – you did an amazing job 🙂

    ReplyDelete

  2. Wooow! You did an amazing job here. Totally loving the tutorial.
    By the way, thanks for choosing We Love Colors.

    ReplyDelete

  3. This came out amazing~! It's super beautiful <33

    alluringalyssbeauty.blogspot.com

    ReplyDelete

  4. So pretty! You did a fantastic job : )

    ReplyDelete

  5. You always put so much love and passion into what you do. I loved all the details and the photo of you sewing all the tulle. Great costume dude.

    ReplyDelete

  6. This is a lovely take on the character. I'm always so impressed at how well you re-purpose found items!

    ReplyDelete

  7. Thanks very much for your sharing, you are gorgeous with the costume on,and the
    tutorial is very helpful, i would try to make a costume by following your instructions; I really love the princess, last year i have got a costume from http://cosplaysky.co.uk/, it's beautiful but the price is a little beyond of my budget, thanks again for your sharing ,

    ReplyDelete

Note: Only a member of this blog may post a comment.

Related Posts Plugin for WordPress, Blogger...

OMGLITZY: Tutorial: Adventure Time Fionna Cosplay

Friday, March 14, 2014

Tutorial: Adventure Time Fionna Cosplay

 
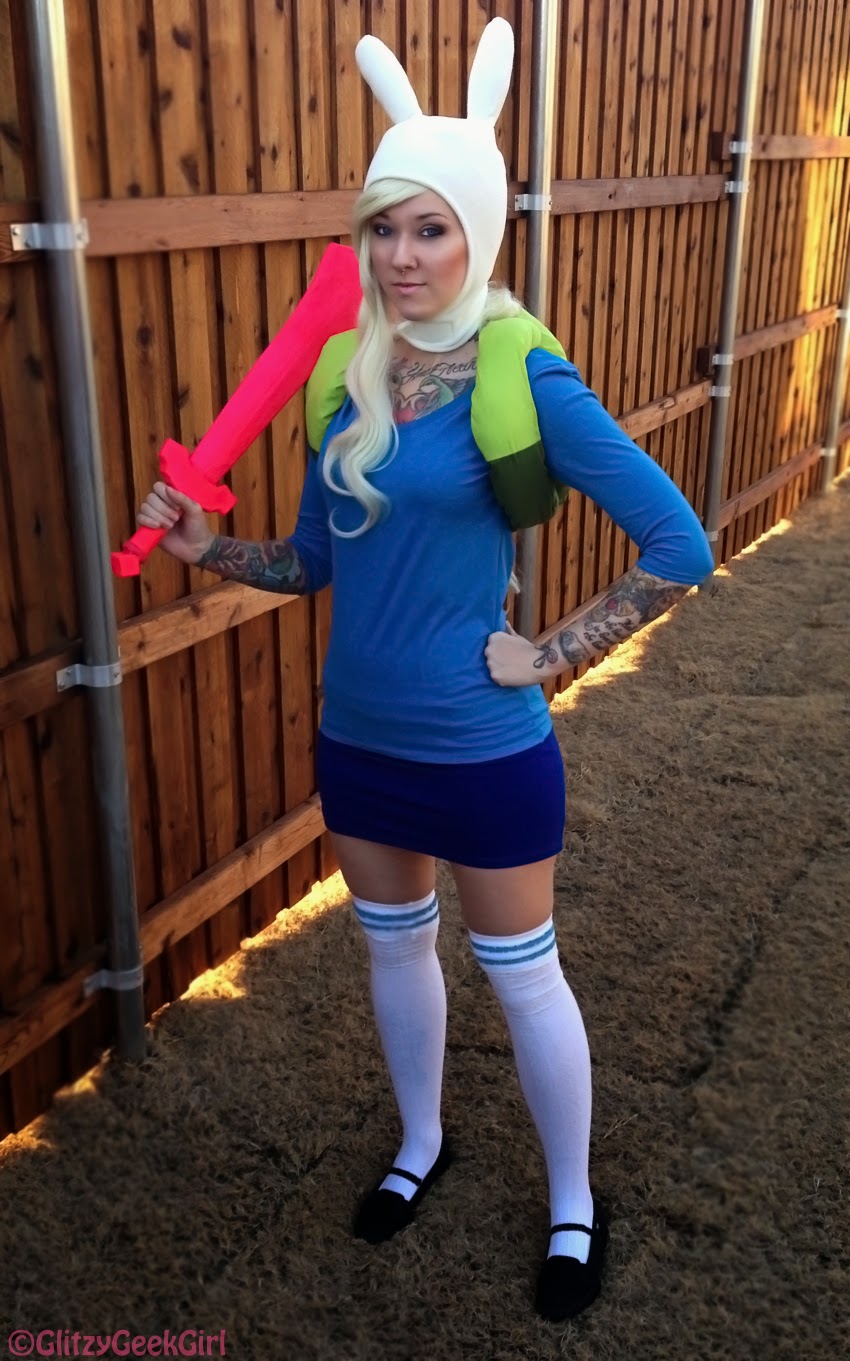
If you’re a fan of Adventure Time then I am sure you’ve thought about wielding your own crystal sword and bunny hat! So this tutorial is for you 🙂

I found all of my supplies at Walmart. The hat, however, was purchased at Hot Topic. It looks like Fionna’s is sold out online but they still have Finn’s for sale. There’s also a lot of great hats for sale on Etsy!

I bought an XL shirt and took it in on the sides. This way it would still be extra long. I am holding it with my hand here. I also shortened the sleeves. The skirt is actually a dark blue tank top. I cut it in half and hemmed it to make it into a skirt.

This sword was in the toy section at Walmart. It’s made of foam. I cut the top and added some extra styrofoam to rebuild the point. I used some styrofoam to make the little square gem at the bottom, too. Then I wrapped it in masking tape and spray painted it. The tip looked kinda wonky, though, so I decided to re-cut it.
I shortened the point to give it a little better shape. Then I just re-taped it and spray painted it again.

The backpack took a little more effort. I didn’t use a pattern at all. I completely made this up as I went.
So first I used a bowl to get a basic shape.

I cut out four half circles – 2 of each color.

Then I laid them on top of each other and stitched the edges together. But make sure to leave the straight part (where I am pointing) open!

For each strap you need one rectangle of each color.

I stitched one color at a time then combined them.

Then I used stuffing to make the straps look thicker.

Be sure you add a button to the outside!

I did a terrible job attaching my straps to the backpack so don’t zoom in, but you get the idea here!

Finally bend your backpack around so you can sew it together. I put more stuffing into mine since this isn’t a real backpack.

Tada!

And the back!
I originally made some socks using little girls stockings and paint, but they were awful. So I found these at American Apparel. They come with three blue lines so I just folded the top down to hide the top line. And since my shoes didn’t have a black strap across them I slipped a black rubber band on my foot!
My wig is from Arda Wigs. It is a Luthien in Titanium Blonde. I bought this to use for a different costume, but it worked well for this, too.
This print is for sale in my Etsy shop!

Edited this blog post to add this pic of Pixie as Cake! Since people always ask me “Where’s Cake?” Lol

This is my friend Krystle Starr as Princess Bubblegum! We filmed a fun video together you can see here.
:+:+:+:+:
Which character is your favorite from Adventure Time?
Let me know if you wear this cosplay!

15 comments:

  1. So cute! And that rubber band idea–so creative! I would've never thought of that or noticed that it was a rubber band! My favorite character is a toss up between Marceline and LSP!

    ReplyDelete

  2. Cool costume. ^^

    http://nagareboshi9.blogspot.ch

    ReplyDelete

  3. I always like your tutorials because you explain and show everything so easily. I like a lot of characters, but the first ones that come to mind are Simon, Marceline, Flame Princess, and the cats who live in cardboard boxes, lol.

    ReplyDelete

  4. Amazing Fiona cosplay!!
    BEEMO!! I love beemo. ^_^

    <3
    Harlynn
    mindyourmadness.blogspot.com

    ReplyDelete

  5. Great tutorial! I definitely wanna try making the crystal sword sometime. My fave characters are PB, Marcelline, Fionna, and Cake! But I love all of them!

    ReplyDelete

  6. Killer Fionna cosplay! Especially love the way the sword came out~

    SupaRadDinosaur

    ReplyDelete

  7. You look just like her. The design of the sword was so clever.

    ReplyDelete

  8. NICE! 😀
    I would love to write a lot more, but my english really sucks… xD >_>

    ReplyDelete

  9. Cute cosplay! I've been wanting to cosplay Fionna for the longest time, and hopefully your tutorial will help!

    ReplyDelete

  10. It looks great! This would probably make a great 1st time cosplay for someone!

    ReplyDelete

  11. Awesome costume!!!

    ReplyDelete

  12. I love that costume so much! Now all I have to find is a tutorial about making a Cake costume for a miniature horse!
    LOL! l . l <(0.0)> KURBY!!!!!!!!!!!
    I AM A TOTAL GEEK!

    ReplyDelete

  13. Pixie is the spitting image of cake. Nobody puts Pixie in the corner.

    ReplyDelete

  14. Awesome idea for the skirt!I kept googleing "short blue skirt" and things along those lines and they were all either pleated, too long, too short or too expensive! Thanks for this awesome tutorial

    ReplyDelete

Note: Only a member of this blog may post a comment.

Related Posts Plugin for WordPress, Blogger...

OMGLITZY: Top 5 Fav Halloween Movies

Tuesday, October 28, 2014

Top 5 Fav Halloween Movies

October is one of my favorite months of the year! Spooky decorations, cooler weather, and another reason to dress up in costume! Halloween is in just a few days, and I’ve seen several of my friends post all month what movies they’ve been watching to get in the holiday mood. So here is my list of my favorite Halloween movies!
1. The Halloween Tree
This is my all-time favorite Halloween movie. I remember watching it as a kid and not only enjoying it immensely but learning, too. It was the first time I saw how Halloween is celebrated in different ways throughout the world. The main story of how the kids are trying to save their friend will pull your heartstrings, too.
2. Saw II
I’m not a big fan of horror movies. I actually can’t handle gore all that well. But for some reason the second Saw movie is one of my favorites. I still watch it with semi-closed eyes, though! I like how hey are all in a house together and each room has a different “game”. Out of the few Saw films I’ve seen this one stands out in my mind as the most exciting to watch. (Be sure to check out my makeup tutorial for Billy – the creepy doll from the movie!)
3. Edward Scissorhands
It’s hard not to include all of Tim Burton’s movies on my list, but Edward Scissorhands seems to be a very special film to me. The idea of a man with hands of scissors should come off as unnerving, but this films makes Edward appear more magical and soft than creepy or scary. If anything, it’s the rest of the town that makes your skin crawl which is exactly why this movie is so great. It’s beautiful and happy and sad and totally great for Halloween.
4. The Addams Family
Dun dun dun dun *clap clap* dun dun dun dun *clap clap*
“They’re creepy and they’re kooky; mysterious and spooky!”
Gosh this movie is so rad I almost stopped blogging just go watch it right now. The Addams Family totally embodies Halloween for me. Each character is so unique with mysterious personal characteristics! Put the whole family together in a wickedly awesome house and you’ve got one of the coolest families on the block.
5. Jeepers Creepers
I’m just as surprised as you are that Jeepers Creepers is on my list since I don’t like scary movies. But whenever it is on TV I can’t help but watch it. It’s a rather simple story, but jeez that monster really freaks me out. It’s one of the few horror movies that I actually like the ending of, too. And the song is just so catchy and fun to sing! “Jeepers creepers, where’d you get those peepers?”
Honorable mention:
Hocus Pocus, Underworld, Sleepy Hollow
 You can’t have a Halloween list without Hocus Pocus! It’s a must-watch movie for the holiday. And Underworld is my favorite vampire movie. I would love to cosplay as Selene someday. Also, when I saw Sleepy Hollow in the theaters I couldn’t get over how beautiful it was. Christopher Walken also spooked me quite a bit.
:+:+:+:+:
So let me know in the comments what some of your favorite Halloween movies are!

11 comments:

  1. One of my favorite Halloween movies is Trick 'R Treat. Check it out if you haven't heard of it.

    ReplyDelete

  2. I love Edward Scissorhands so much, my heart can barely stand it. And I too have a soft spot for the Underworld movies, although I think Underworld: Rise of the Lycans (the prequel) is my favourite. Lucien is a fox (and a wolf) lol.

    ReplyDelete

  3. No particular order. I'll watch most any horror movie except The Exorcist!

    The Shining
    Wrong Turn
    Hellraiser
    Jeepers Creepers
    Poltergeist

    Happy Halloween!

    ReplyDelete

  4. Great list! Underworld is also my favorite vampire movie 🙂 The Nightmare Before Christmas is one of my go-to Halloween flicks!

    ReplyDelete

  5. I love kids movies so I'm intrigued about The Halloween Tree, never having seen it as a kiddo. All of my favorites are of the children's variety: Casper Meets Wendy, Alvin and the Chipmunks Meet Frankenstien, Kiki's Delivery Service, Fun Size and The Little Vampire!

    ReplyDelete

    Replies

    1. Omg I totally forgot about the Casper movies! That's one of my favs, too!

      Delete

  6. Edward Scissorhands will always have my heart. My traditional Halloween flick of choice is by far Beetlejuice!! Love Wynona Ryder! That kids Halloween movie looks super cute, gonna have to look for it when I watch my friends kids next!

    ReplyDelete

  7. Movies should project what should we truly enjoy and that is a beautiful life that is full and love and caring for each other, such movies would in a way influence our lives.

    ReplyDelete

  8. Ahh the Saw movies creep me out. I love Edward scissorhands and Adams family too. I just watched Dark Shadows again that's one of my new favs, I also like the Corpse Bride and Beetlejuice.

    ReplyDelete

  9. I also had to watch Hocus Pocus for Halloween! When I was a kid I watched that movie so many times!!!

    ReplyDelete

  10. I love the Addams Family! And I need to check out The Halloween Tree! But I too made a Top 5 Halloween flick list here!

    ReplyDelete

Note: Only a member of this blog may post a comment.

Related Posts Plugin for WordPress, Blogger...